頁面目錄
前言:
為因應Fortinet釋出新版FortiOS 7.6.3後完全取消所有FortiGate型號的SSL-VPN Tunnel Mode,Client to Site存取全面導向IPsec VPN和Agentless VPN,建議提早轉用IPsec VPN 。本篇文章將說明如何設定 FortiGate IPsec VPN for Client 與比較兩個IPsec VPN協定IKEv1/IKEv2的差異,後續的設定範例我將著重於IKEv2協定的部分,讓我們繼續看下去:
一些原廠提供的背景說明文件如下:
SSL VPN tunnel mode replaced with IPsec VPN
Migration from SSL VPN tunnel mode to IPsec VPN
| 項目 | IKEv1 | IKEv2 |
| 發布時間 | 1998 (RFC 2407/2408/2409) | 2005 (RFC 4306),後續更新至 RFC 7296 |
| 標準複雜度 | 較複雜,有多種協議與模式(Main, Aggressive) | 簡化流程,整合多個步驟 |
| 效率 | 建立連線需 6 個封包(Main Mode) | 只需 4 個封包,效率更高 |
| NAT 穿透 | 支援但需額外協議(NAT-T) | 原生支援 NAT-T |
| 支援流量重傳 | 無(依賴 IP 層) | 支援封包重傳與順序控制 |
| 移動性與多主址支援 | 無 | 支援(Mobike) |
| 強制身份驗證方式 | 預設支援憑證與預共享密碼 | 同上,但加入 EAP,支援多種身份驗證方式 |
| 錯誤回報 | 不明確 | 明確的錯誤回應(更易除錯) |
| 延伸性 | 差,修改困難 | 高,可延伸與整合新功能 |
| 廣泛支援度 | 廣泛支援,尤其是舊設備 | 現代系統中為主流,如 Windows 10、iOS、Android |
| 安全性 | 相對較弱(設計較早) | 更安全(改善 DoS 防護、身份保護等) |
環境說明:
FortiOS版本:After 7.0
FortiGate IPsec VPN for Client:
PS:以下設定範例以IKEv2為主
情境一:使用Peer ID區分不同IPsec VPN tunnel做存取管理
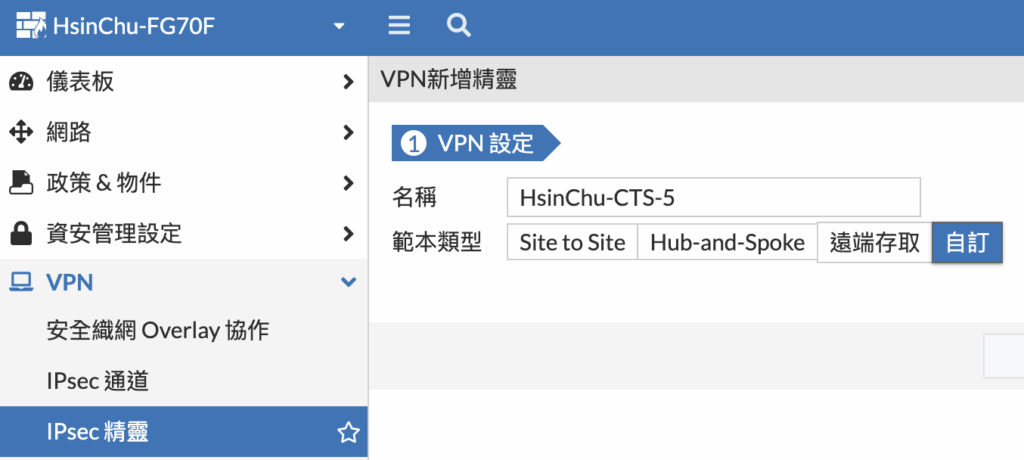
新增IPsec VPN Tunnel範本類型選自訂
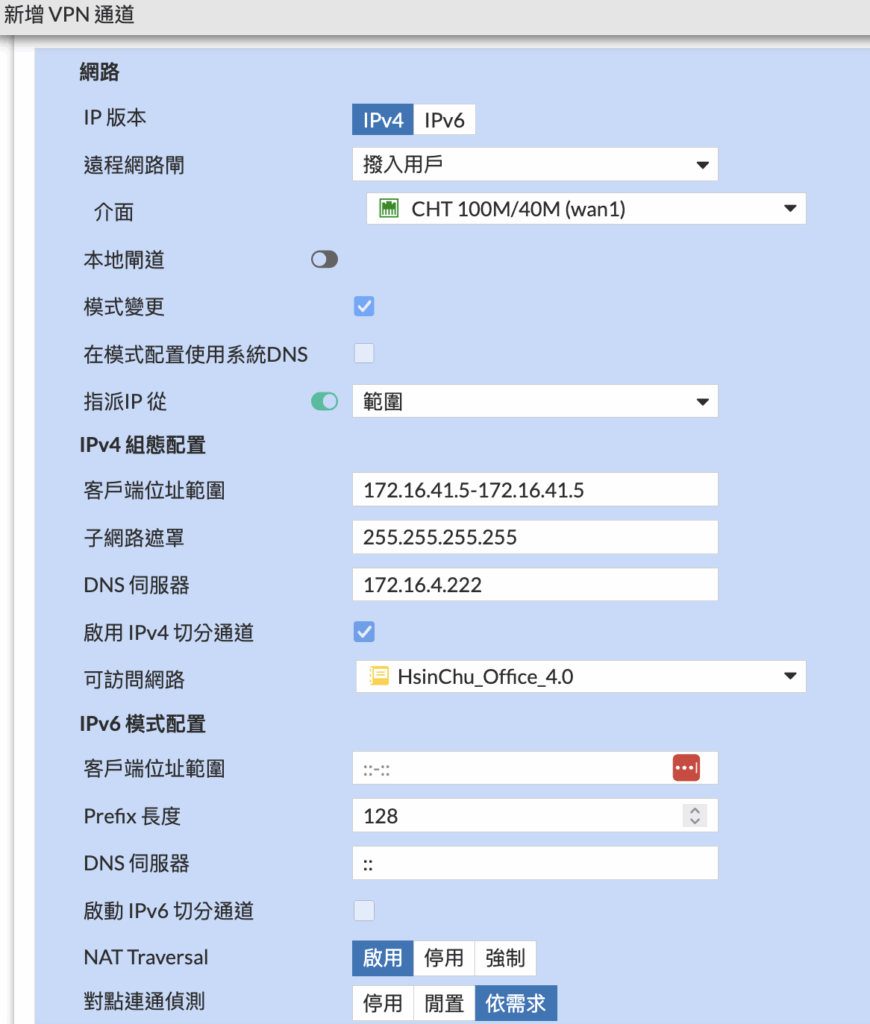
網路設定:
- 遠程網路閘選撥入用戶
- 介面選wan介面
- IPv4配置依需求定義VPN發放的位址範圍/DNS伺服器
- 啟用切分通道設定可存取的內網IP(如有多網段可先設定Address Group)
- 對點點偵測選依需求
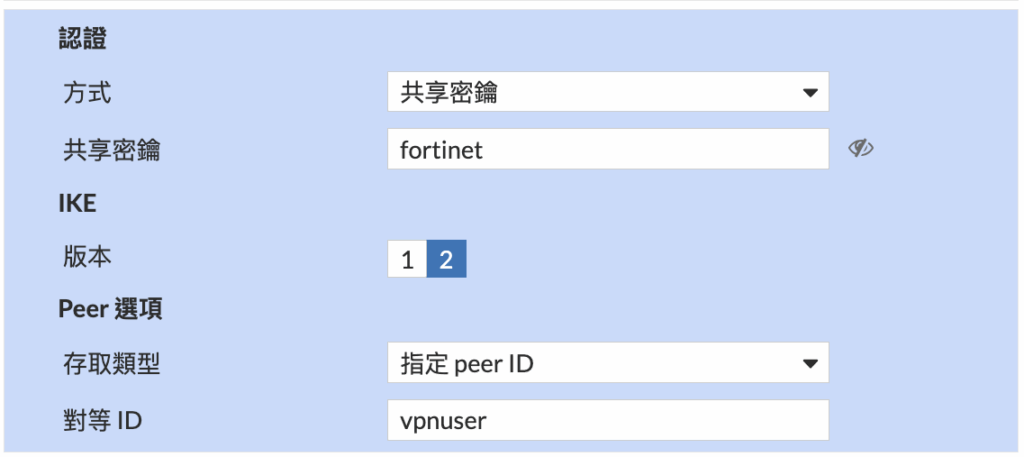
認證設定:
- 設定共享密鑰
- IKE版本選2
- Peer選項選指定peer ID,設定peer ID的目的為區分不同IPsec VPN tunnel
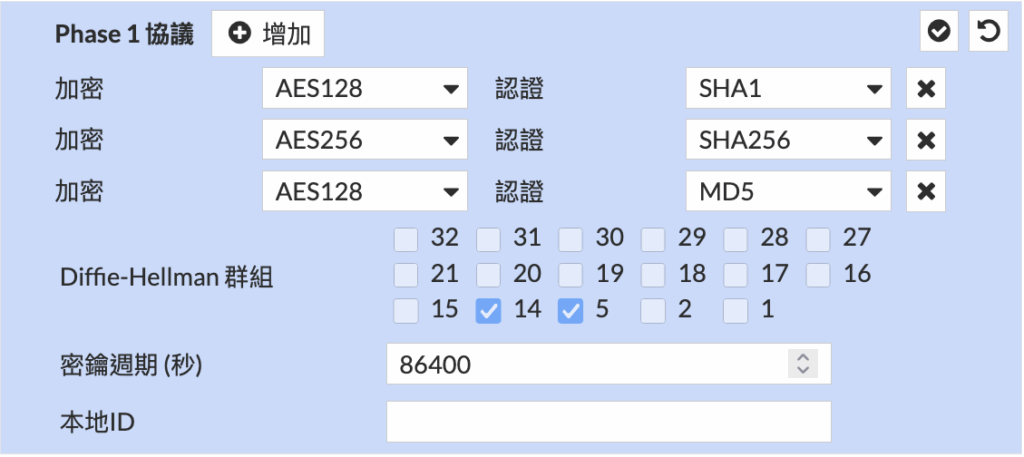
Phase1設定:
- 設定要選用的加密方式
- 設定要選用的DH群組
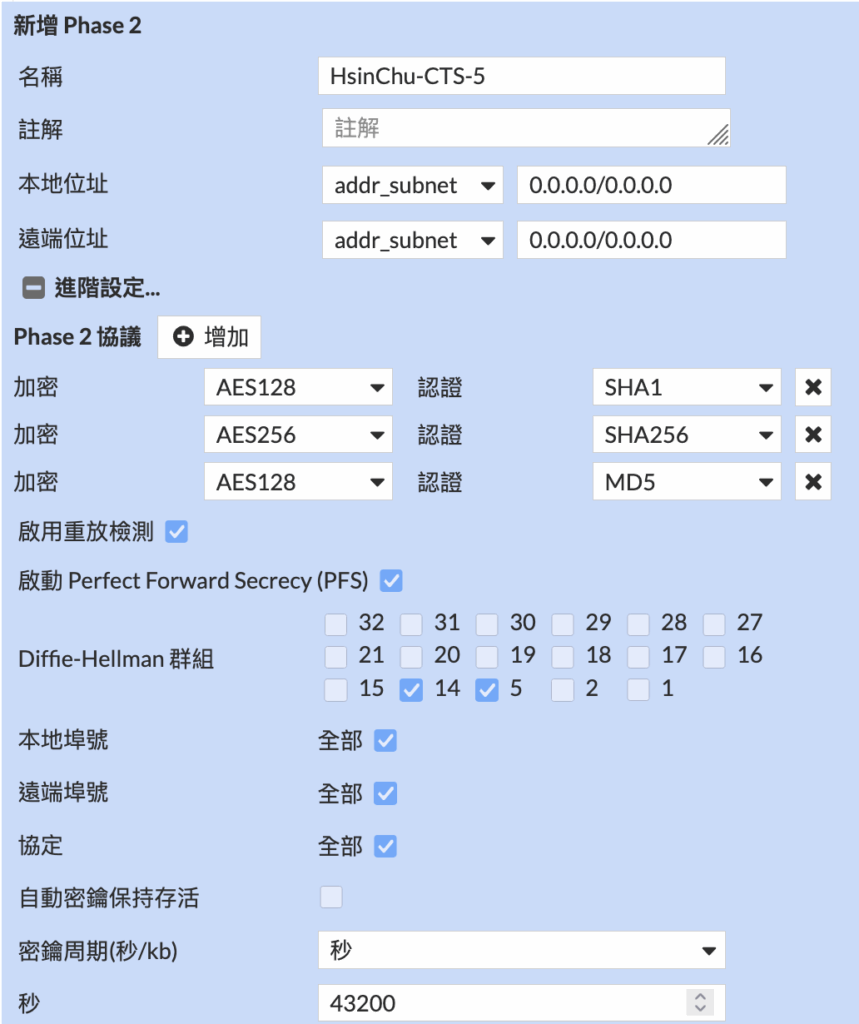
Phase2設定:
- 設定要選用的加密方式
- 設定要選用的DH群組

建立防火牆policy存取控管,依需求啟用NAT與Security Profiles
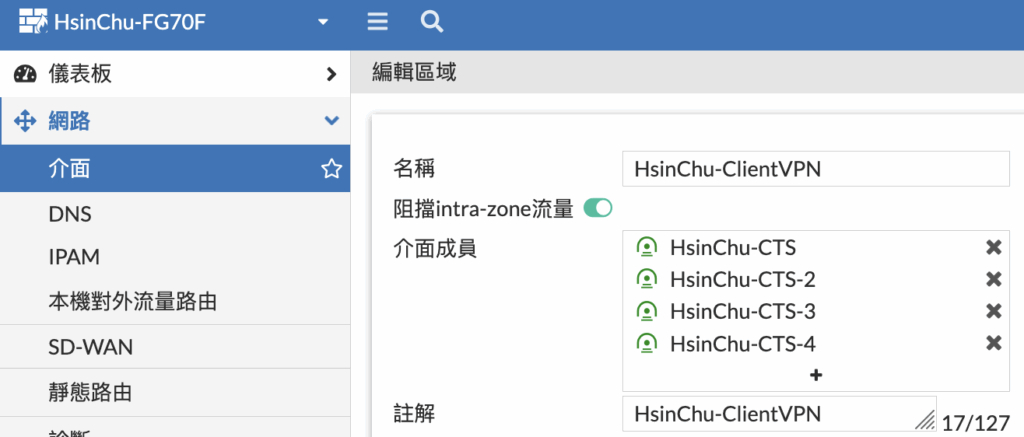
如因進行細緻的權限控管建立多條IPsec VPN tunnel,可新增區域介面群組tunnel簡化policy控管
config vpn ipsec phase1-interface
edit HsinChu-CTS-5
set type dynamic
set interface wan1
set ike-version 2
set peertype one
set net-device disable
set mode-cfg enable
set ipv4-dns-server1 172.16.4.222
set ipv4-dns-server2 172.16.4.223 #如有解析內部DNS需求可設定最多三台DNS Server位址
set internal-domain-list unicomp.com.tw test.com #設定要解析的內部Domain Name可設定多組
set idle-timeout enable #啟用idle timeout
set idle-timeoutinterval 20 #設定idle timeout時間
set proposal aes128-sha1 aes256-sha256 aes128-md5
set dhgrp 14 5
set peerid vpnuser
set ipv4-start-ip 172.16.41.5
set ipv4-end-ip 172.16.41.5
set ipv4-split-include HsinChu_Office_4.0
set client-auto-negotiate enable #設定自動協商
set client-keep-alive enable #設定連線持續存活
set psksecret ENC ***
set dpd-retryinterval 60
end
config vpn ipsec phase2-interface
edit HsinChu-CTS-5
set phase1name HsinChu-CTS-5
set proposal aes128-sha1 aes256-sha256 aes128-md5
set dhgrp 14 5
end
IPsec VPN指令參考範例
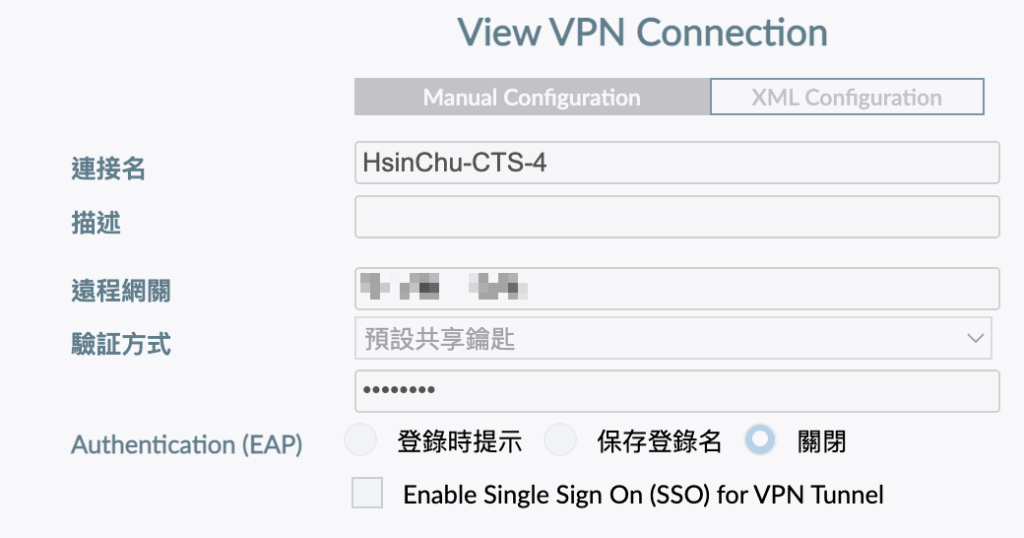
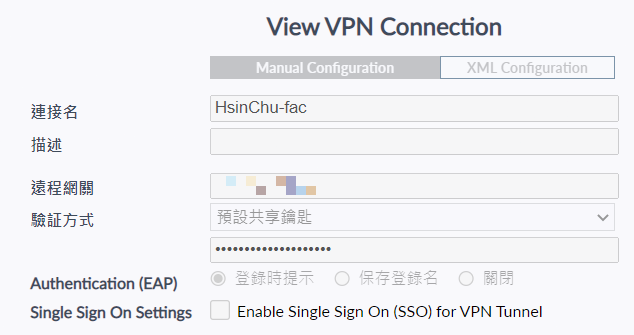
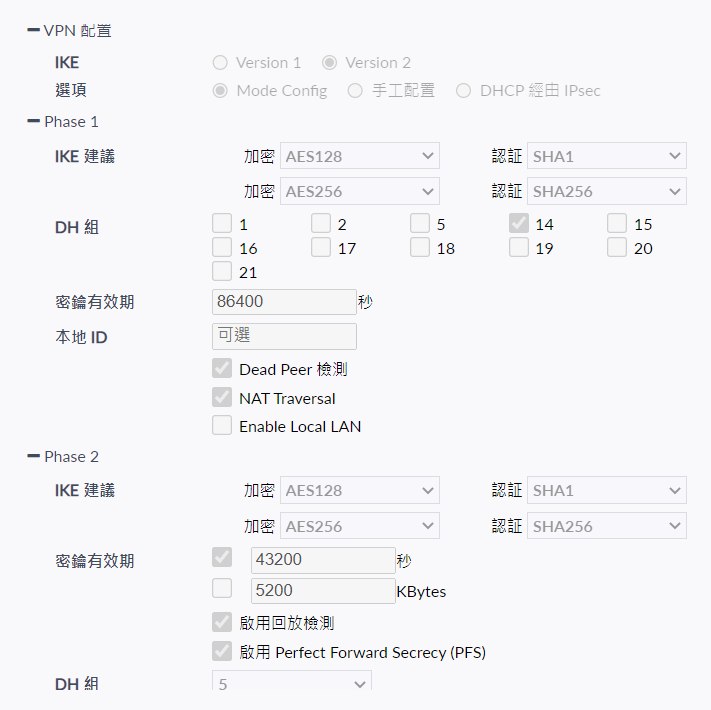
FortiClient連線設定:
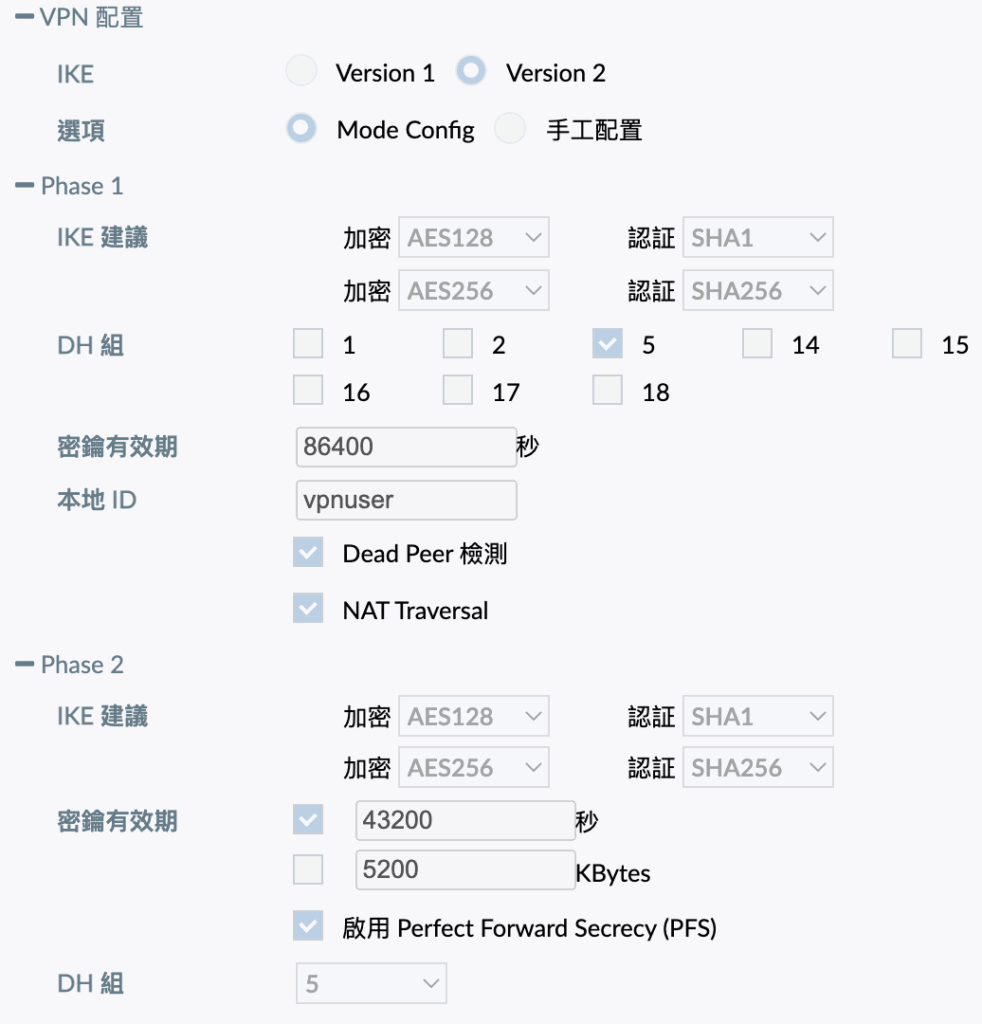
- 設定遠程網關IP
- 設定驗證方式預設共享金鑰,同認證設定上的共享密鑰
- 停用EAP驗證
- 設定Phase1加密驗證與DH Group,本地ID同認證設定上的peer ID
- 設定Phase2加密驗證與DH Group
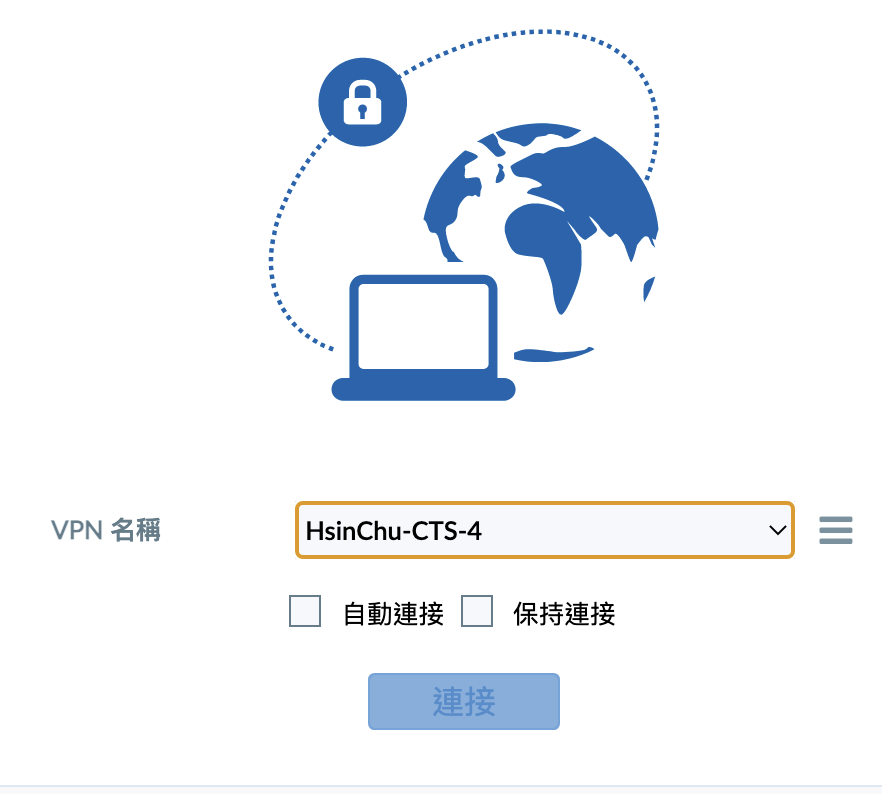
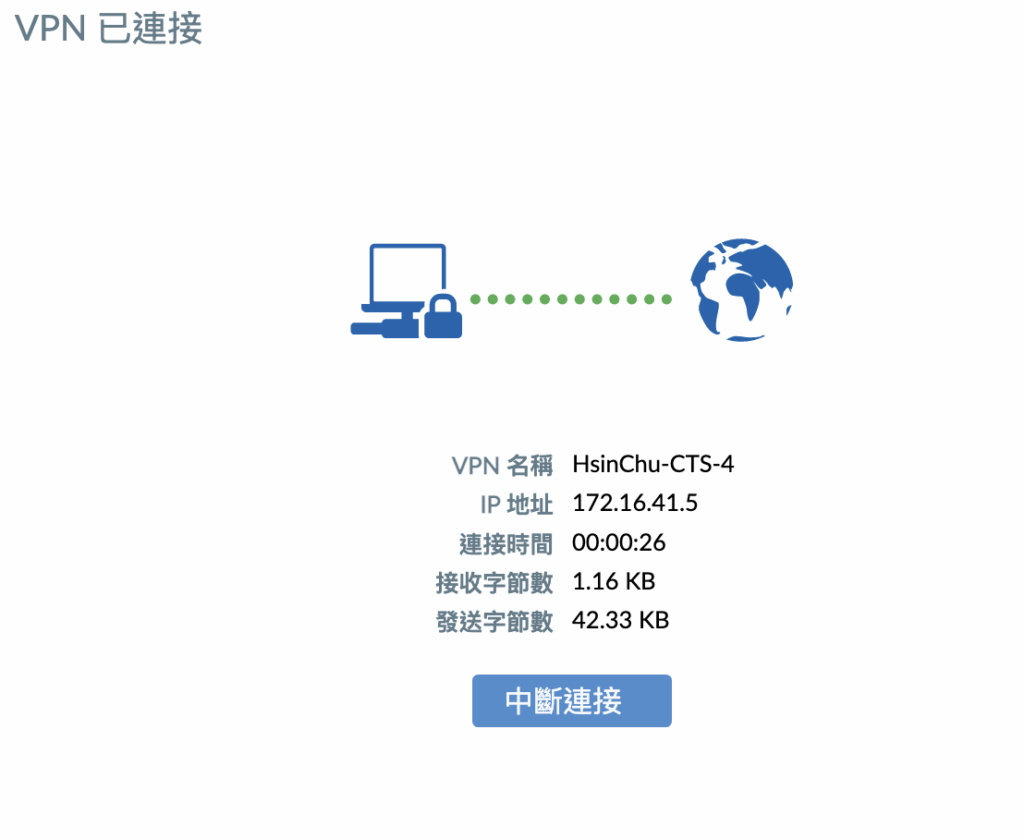
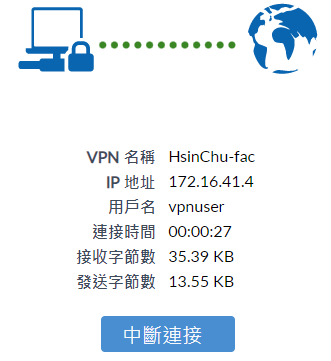
FortiClient測試連線IPsec VPN成功
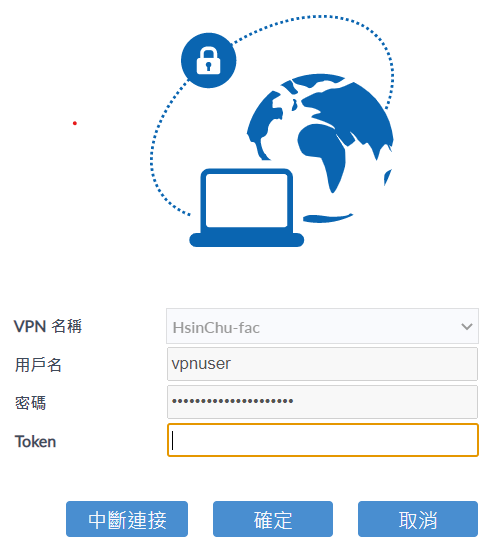
情境二:IPsec VPN使用EAP認證整合2FA與push
IKEv2支援EAP身份認證可與支援EAP的認證服務器整合如有2FA與push的需求也能支援,以下範例使用FortiAuthenticator。有關FortiAuthenticator認證的設定方式可參考本站FortiAuthenticator整合SSL-VPN認證
config vpn ipsec phase1-interface
edit IPSec-fac
set type dynamic
set interface wan1
set ike-version 2
set peertype any
set net-device disable
set mode-cfg enable
set ipv4-dns-server1 172.16.4.222
set internal-domain-list unicomp.com.tw
set proposal aes128-sha1 aes256-sha256 aes128-md5
set dhgrp 14
set eap enable #啟用EAP
set eap-identity send-request
set authusrgrp unicomp-fac #選擇預先定義的好Radius使用者群組
set idle-timeout enable #啟用idle timeout
set idle-timeoutinterval 20 #設定idle timeout時間
set ipv4-start-ip 172.16.41.4
set ipv4-end-ip 172.16.41.4
set ipv4-split-include IPSec-fac_split
set save-password enable
set client-auto-negotiate enable
set client-keep-alive enable
set psksecret ENC ***
end
config vpn ipsec phase2-interface
edit IPSec-fac
set phase1name IPSec-fac
set proposal aes128-sha1 aes256-sha256 aes128-md5
set dhgrp 5
end
IPsec VPN指令參考範例
FortiClient連線設定:
- 設定遠程網關IP
- 設定驗證方式預設共享金鑰,同認證設定上的共享密鑰
- 啟用EAP驗證
- 設定Phase1加密驗證與DH Group
- 設定Phase2加密驗證與DH Group
情境三:IPsec VPN使用Policy群組做存取管理
config vpn ipsec phase1-interface
edit “HsinChu-CTS-6”
set type dynamic
set interface “wan1”
set ike-version 2
set peertype any
set net-device disable
set mode-cfg enable
set ipv4-dns-server1 172.16.4.222
set internal-domain-list “unicomp.com.tw”
set proposal aes128-sha256 aes256-sha256 aes128gcm-prfsha256 aes256gcm-prfsha384 chacha20poly1305-prfsha256
set eap enable #啟用EAP
set eap-identity send-request
set idle-timeout enable #啟用idle timeout
set idle-timeoutinterval 20 #設定idle timeout時間
set ipv4-start-ip 172.16.41.6
set ipv4-end-ip 172.16.41.6
set ipv4-split-include “HsinChu-CTS-6_split”
set save-password enable
set client-auto-negotiate enable
set client-keep-alive enable
set psksecret ENC ***
end
config vpn ipsec phase2-interface
edit “HsinChu-CTS-6”
set phase1name “HsinChu-CTS-6”
set proposal aes128-sha1 aes256-sha1 aes128-sha256 aes256-sha256 aes128gcm aes256gcm chacha20poly1305
end

建立防火牆policy使用user group控管存取權限
原廠參考文件:
IPsec VPN with FortiToken Mobile push MFA
Using single or multiple user groups for user authentication